8/17/22 This tutorial has recently been updated to reflect coqui v7 code changes, although problems may still arise. Please let me know if you encounter any errors.
The What, Why, Who, and When of TTS creation
Have you no friends? Does no one seem to “get you?” Do you find yourself talking to your reflection for hours on end hoping for some flicker of social interaction, much like a lost sailor drinking his own urine? Well, with the advancement of technology, you can now talk to yourself but with a technological twist!
This article will use the brand new AI model called VITS to clone our voice using the ever-helpful coqui TTS. This will allow you to generate better speech, with less data than ever before, and it’s (almost) free to do without access to insane supercomputer hardware. Many other tutorials I have seen are either incomplete, broken, or using antiquated technology and minimal tools to configure training. This will be your best place to get the full, end-to-end process.
Cloning your voice not only is a fun gag to play with but presents a seemingly unending list of implementations for future projects. Make your own version of Siri, create a completely digital, AI-powered you (coming soon), and much much more. It’s not for the faint of heart, unlike some of my previous tutorials but is well worth the work and experimentation.
This project has been on the backburner for the past year, and only now am I confident enough to share my experience, hopefully making treading the same ground easier than those before. So let’s jump into the world of voice cloning, the art of dataset creation, and the intricacies of configuration.
I will be splitting up this tutorial into five distinct sections, each detailing the what, why, and where for each step. Click the below to skip to whichever part, because lord knows this is going to be a long article.
- Dataset Creation
A. Installing Libraries
B. Preparing
C. Recording - Preprocessing
- Configuration
A. Installing
B. SNR
C. Config Files - Training
A. Setting Up
B. Reviewing - Generation
Requirements
- A good microphone and minimal outside noise
- A Google Colab Pro account
- Basic knowledge of Audacity or Adobe Audition or similar
- Basic Python programming knowledge
- Anaconda Installed
- At least 100GB google drive account
1. Dataset Creation
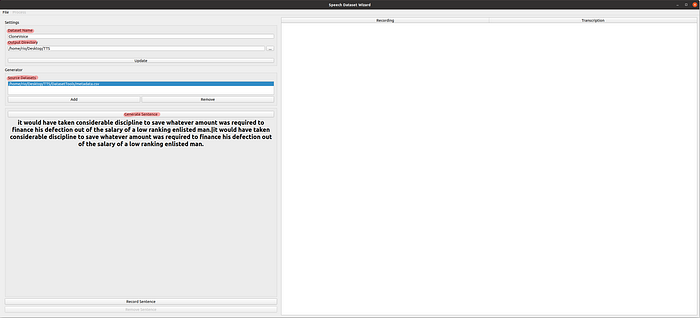
Before we can start even thinking of training, we need data to train with. The way the AI we are using reads data, it must be formatted in a very particular way. Thankfully, a program exists that makes this process easier. Created by a user formally known as GalaticGum, I modified it to fit our current needs for TTS creation. It’s the best way to create a dataset, in my experience, without the hassle of having to manually transcribe everything you say. This will be done locally on a computer, unlike the training that is done on the cloud. But it is not computer-intensive.
The python script will automatically format your recordings like so; with each wav file corresponding to a short phrase or sentence from our phrasedata.csv file.
/MyTTSDataset
      |
      | -> metadata.csv
      | -> /wavs
              | -> audio1.wav
              | -> audio2.wav
              | ...# metadata.csvwavs/audio1.wav|This is my sentence.
wavs/audio2.wav|This is maybe my sentence.
wavs/audio3.wav|This is certainly my sentence.
wavs/audio4.wav|Let this be your sentence.
A. Installing Libraries
We first need to install the python file for dataset creation and create the conda environment.
From there, create a conda environment and clone the dataset generator repo like so:
git clone https://github.com/rioharper/VoiceDatasetCreation
conda create -n dataset pyaudio ffmpeg
activate the environment and cd into your VoiceDatasetCreation folder.
from there, install additional libraries using the following code:
pip install -r requirements.txt#run this if you are on linux as well
sudo apt-get install '^libxcb.*-dev' libx11-xcb-dev libglu1-mesa-dev libxrender-dev libxi-dev libxkbcommon-dev libxkbcommon-x11-dev
The AI learns from what you give it, so if you have a specific use case (let’s say you plan for it to discuss cooking instructions) then you can create your own .csv file but with the vocabulary and sentence structure that you see in a cookbook. This may increase the performance of the model in that area. If you do decide to do that, just make sure to have it in the same format to phasedata.csv
B. Preparing
Before you run the python file, you need to prepare for the recording process. VITS is very particular about background noise.
- Get in a place where you hear minimal cars, lawnmowers, the cries of the people in your basement, kitchen clanking, etc.
- To confirm your microphone sounds optimal, test it on an audio recording software at a 22050hz sample rate.
In my experimentation, I find that at least 100 voice samples create a desirable result although some people only needed a minute of total voice data. The best advice I can give is to start with a small amount and scale up as you become more confident in your coqui TTS understanding. Nonetheless, voice recording can easily take an hour+of sitting at the microphone. Because you want the audio to sound the same throughout the dataset, you won’t want to space this out across several recording sessions. Get a blanket, some food, and plenty of water because you are going to be there for a while.
C. Recording
Now you are ready to start recording. So let’s open up that python file and give it a whirl.
Dataset Name: This is yours to choose, but don’t add any special characters (!, :, %, etc) or spaces.
Output Directory: Select the same directory you imported the python file into.
Source Datasets: You will want to add the phrasedata.csv file here, which will contain the lines you will readout.
Generate Sentence: Once all of the above is done, click this button to generate a line from which to read. The below box will output the text. Press the record/stop recording button to read out each sentence. (Make sure to expand the python window to see all the text you need to say) Only read up to the “|” bar and do not repeat any words.
Tips: Enunciation is key. Make sure to make each word you say clear while maintaining a fluid and natural cadence. Try to make how far away your microphone is from your mouth consistent, as well as your volume.
There are open source applications like EasyEffects which can apply noise reduction filters in real time, and improve the quality of your dataset if you are in an audibly noisy enviroment. Just make sure to test the quality before starting recording!
2. Preprocessing
Congratulations, you’ve done it! You can frolic in some grass, the sunlight smothering you in kisses as unicorns prance around you and the birds chirp beautiful odes in your greatness.
Ha. Sike. You still got plenty to do. But it is, unfortunately, needed. You’ve come this far, right? So now it’s time to check your recordings. Open up your preferred audio processing program (I personally use Adobe Audition) and import your .wav voice recordings. Also, open your metadata file that was created with your dataset. From here, you want to check and fix any of the following issues with each recording:
- Removing silences from the beginning and end of the files
- Cross-checking the audio and the transcription to confirm that the audio uses correct punctuation and word choice (if not, change the text of the metadata file to match the audio)
- Removing unnatural pauses in speech and gasps for air. Rerecord pieces if necessary.
NOTE: There are applications like wavepad which can potentially automate this process through batch processing, although the quality can vary greatly which will impact your final result.
After combing through your dataset, feel free to use your program’s filters to improve the quality of your voice recordings. You will want to create copies of your dataset so you can experiment with different parameters without potentially ruining your only copy. Personally, I use:
- The FFT filter to remove plosives (the pop from saying p too hard)
- Noise reduction
- Voice equalizer to ensure all my files are at the same level dB (-7 to -10 dB is a good range)
Feel free to experiment with other features of your particular software, just make sure you have a backup of your changes in case things go awry. Save your files, and zip your dataset as you’re ready to configure training!
3. Configuration
Good job, you got through the most tedious part of the process. Now it’s time to judge not only how good your dataset is, but how to squeeze as much performance out of it as possible. The following link will open up a google colab notebook for you to run diagnostics.
A. Installing
Copy this notebook onto your own google drive account, and then follow along:
- First, run setup. Make sure to connect your notebook to the drive you want to train your TTS model with.
- Then install libraries
- Upload your dataset to google drive under the VoiceCloning/datasets folder and unzip using google colab.
B. SNR
SNR is an acronym for “Signal to Noise Ratio” (the ratio between your voice and background noise) and will give you a rough estimate of what voice clips are good, and the ones that need to get scrapped. The code will point out the worst quality clips in your dataset, which you can remove manually. If your average falls below a value of 15, your dataset is of poor quality, and either you should spend more time processing the audio or rerecord it entirely. I’ve probably made 6 fully finished datasets out of experimentation before I got an SNR that I was happy with. Hopefully, you’re a better speaker than I.
C. Config Values
After sifting through your SNR data, you can then go on to set your training configuration. Don’t expect generated voice samples to sound like your ground truth, but getting as close as reasonably possible is the goal. You can compare other values, but I find that the ones I included are most influential when training. Once you’re happy choosing which values sound best, note them down and we can continue onto training!
4. Training
Now for the waiting game. For the sake of simplicity, I’ve made training a separate notebook, but this first one covers the meats and potatoes of the training process. Open ‘er up and we can get cooking.
For non-english speakers who wish to create a VITS model, there are continious model releases on the Coqui GitHub, including Italian, German, and more. If your preferred language is not included, you can either create a model from scratch (will take more time + data) or use a different, older model that has more community pre-trained models, like tacotron2. Check the Coqui Docs here for more information.
A. Setting Up
First, connect to the same google drive as the one you used for configuration, and install the necessary files. From there, we need to add our values to the training process.
To train without crashing, click “runtime” on the top right, and select “change runtime type” and change that to using a GPU, select “High-RAM” and save.
Run the next cell, and if you set all your paths up correctly it will begin to start training. However, just because you got all the tools for open-heart surgery, doesn’t mean it’s smooth sailing from there. You will want to review closely your training process and make sure that it all goes to plan.
Google Colab won’t run forever and will time out. However, you can continue training by starting back up. In the notebook, install all the libraries, and change “resume_from” to the path to the tar file of your most recent training.
B. Reviewing
Thankfully, a wonderfully useful tool called Tensorboard is enabled on Coqui TTS, and so we can see real-time visualizations and samples of the audio.
While the training is running, open up this notebook:
From there, connect your google drive and load the tensorboard tab. Here, you can review your training. You can restart the tensorboard code block to update the results. For a basic understanding, these values are of note:
vits_TrainEpochStats/avg_loss_1: How closely the synthesized audio matches the ground truth (your actual voice). The lower the value, the better. It should be continuously going downward. Here is a sample of a healthy graph:
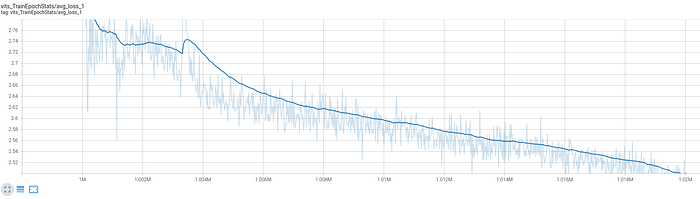
If the loss value begins to creep up, that means there is not enough data for the AI to continue to train and is a sign you might want to stop (in some instances the quality can continue to improve even after loss value stagnates or goes up, depends on the dataset). Do not pay attention to other loss graphs, as they seem to be redundant.
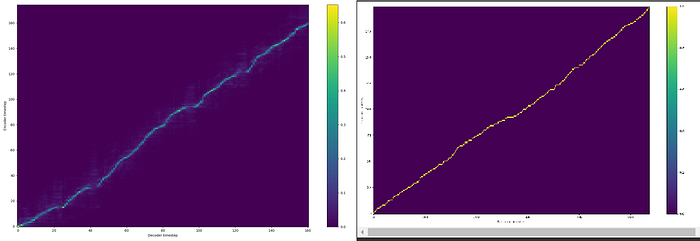
(Under Images) Alignments: The images show the alignment of various lengths of generated audio. Alignment being the TTS bot being able to understand a length of audio corresponds to a word in your metadata. The goal for your alignment graph is to be high rez (a fine line) that is yellow and diagonal with minimal bumps. Below is an example of a healthy alignment, and a broken alignment:
Audio (Samples): There will be 5 voice samples generated every few hundred steps of differing lengths. Here, you can listen to each of them to see what your model sounds like. You can use the slider at the top of each card to see the progress of the quality of the model.
Training will likely take a few days, but in comparison to starting a model from scratch, that time is minuscule. Once done, stop the training use the latest .tar model to generate audio.
5. Generation
The moment of truth. What a terrifying thought. So many hours spent combing data, ruining your vocal cords, and analyzing graphs for this moment. I would recommend perhaps some celebratory sparkling cider. Through hell and back, you have prevailed.
Past the training code, you will find the block to generate audio. While there are ways to tinker with the output of the model, I won’t get into that here (check coqui TTS documentation for more detail).
Generation, thankfully, is fairly straightforward. You will want to change the model_path to the most recent training .tar file, as well as change the config_path to the .json file generated in the same folder as the .tar file. The text in quotations will be the speech generated (note: make sure to add proper punctuation at the end of phrases, otherwise the TTS might get confused).
Test out your model with differing lengths, expressions, and words. If you want a good list of tests, here are some good sentences to try out verified by IEEE Subcommittee on Subjective Measurements:
The birch canoe slid on the smooth planks.Glue the sheet to the dark blue background.It’s easy to tell the depth of a well.These days a chicken leg is a rare dish.Rice is often served in round bowls.The juice of lemons makes fine punch.The box was thrown beside the parked truck.The hogs were fed chopped corn and garbage.Four hours of steady work faced us.Large size in stockings is hard to sell.
And of course, don’t forget to have fun with the fruits with your labor too. You can download your model and run the code on any computer, assuming TTS is installed.
For some comparison, here are a few of my generated snippits:
Conclusion
And that’s it. For now, at least. If you want to dive further into TTS technology, I have only covered the absolute basics of training. The Coqui TTS documentation gets much more into detail and is still very much active. They are releasing new models every few months that improve in quality, speed, and lessen the data needed to train a good model. Many of these steps, including configuration and dataset creation, can be used to expedite the process. A few tweaks to the training file (detailed in Coqui TTS documentation) will get you up and running in no time. Feel free to comment on any special tricks you’ve found, or questions about the training process.
COMING SOON: How to create your AI clone — on Discord
Keep talking in the mirror, perhaps it’ll start to talk back.